How to create your first song in GarageBand
By Lawrence King, FXpansion


If you have an Apple device, then you can download GarageBand for free — even if you’ve never made music before. GarageBand is popular worldwide and is maybe the best Digital Audio Workstation (DAW) for getting started with music production. Just ask singer-producer Grimes, who used GarageBand to create critically-acclaimed albums such as Visions (2012), all without previous experience or training.
This step-by-step desktop guide shows you how to produce your first simple track with GarageBand's powerful tools. From these humble beginnings you might go onto produce your first album like Grimes!
Download GarageBand free from the App Store and install it to begin.
Getting Started
1) Open the GarageBand application from Dock or Applications folder.

2) At the New Project screen, select Empty Project and click Choose to begin a new blank project.

3) In the next window you’ll be asked to select the track you wish to create - this can be a Software Instrument (such as a synthesizer, drum machine or sampler), and Audio track (for recording using a microphone, or importing other audio files). We’ll leave Drummer for now.
4) Select Software Instrument from the window and click Create - you’ve created your first instrument track!

Playing your instrument
Now that you’ve created your first instrument, you’ll need a way to play it.
1) If you don’t have any sort of MIDI controller, you can play with your typing keyboard. Simply press Cmd + K to reveal the on-screen musical keyboard, which indicates the keys you can use to play notes.

2) If you have a ROLI Lightpad or Seaboard Block, or any other MIDI controller, you can connect it to your Mac and use it to play notes. You can make sure your device is connected by heading to Preferences (Cmd + ,) and selecting the Audio & MIDI tab.

Selecting your sounds
1) By default, a Classic Electric Piano sound will be loaded when you create a new instrument. However, if you take a look at the browser on the left, you’ll see a range of different categories you can choose from. You can expand the size of the browser by clicking & dragging.
2) Select one of these categories, and their contents will be displayed. For instance, let’s take the Synthesizer category; clicking this gives you a list of different synthesizer subcategories to choose from. Let’s try EDM Chord - click this subcategory, and you’ll see a list of presets you can load.
3) Try playing some notes and selecting the different presets, and choose your favourite. We’ll go with Chicago Chords for now, which lets you play notes inspired by classic Chicago house music.

Recording your sounds
Once you’ve got a melody you’re happy with, it’s time to lay it down!
1) At the top of the screen you’ll see that the tempo is currently set to 120 beats per minute (BPM). Try clicking the Play button to hear how fast this is, and click & drag the tempo display to change it to your desired tempo.

2) Now you’re ready to record! Below the tempo display you’ll see a grey selection from bars 1 to 4 - click this to enable looping, which will turn the bar yellow. Once this is ready, click the Record button or press R on your keyboard, and recording will begin.

3) Any notes you now play will be recorded - try playing along with the metronome, which you can enable or disable at the top of the window or with the K button on your keyboard.

4) Once you’ve finished recording, press the Record button again to finish. You can now play back when you’ve recorded by pressing the Play button.
Editing your sounds
You might want to change the timing or the pitch of the notes from your recording, which you can edit easily in the Piano Roll.
1) Your recorded notes are stored in a green MIDI clip. Double-click this to enter the Piano Roll. Here you’ll see the notes you played laid out on a grid corresponding to a chromatic keyboard.

2) If you press Play, you’ll see the playhead moving along and playing the notes you recorded. By clicking and dragging these notes, you can change their pitch and duration - give it a go!

3) You can use the Time Quantize options to adjust the timing of a selection of notes. Try highlighting all of the notes you played using Cmd + A and then selecting 1/16 from the Time Quantize menu on the left of the Piano Roll. This will ‘snap’ all of the notes to the nearest 16th note, ensuring everything plays back in time.

Adding a beat
Okay, so you’ve recorded a melody; now it needs some rhythm to back it up.
1) You can create another instrument track by clicking the plus button at top of the arranger. Click Create as you did previously to create a second Instrument track.

2) GarageBand will automatically load another Classic Electric Piano onto this track, but you can change it by using the scrollbar at the bottom-left of the screen to navigate back to the main instrument browser.
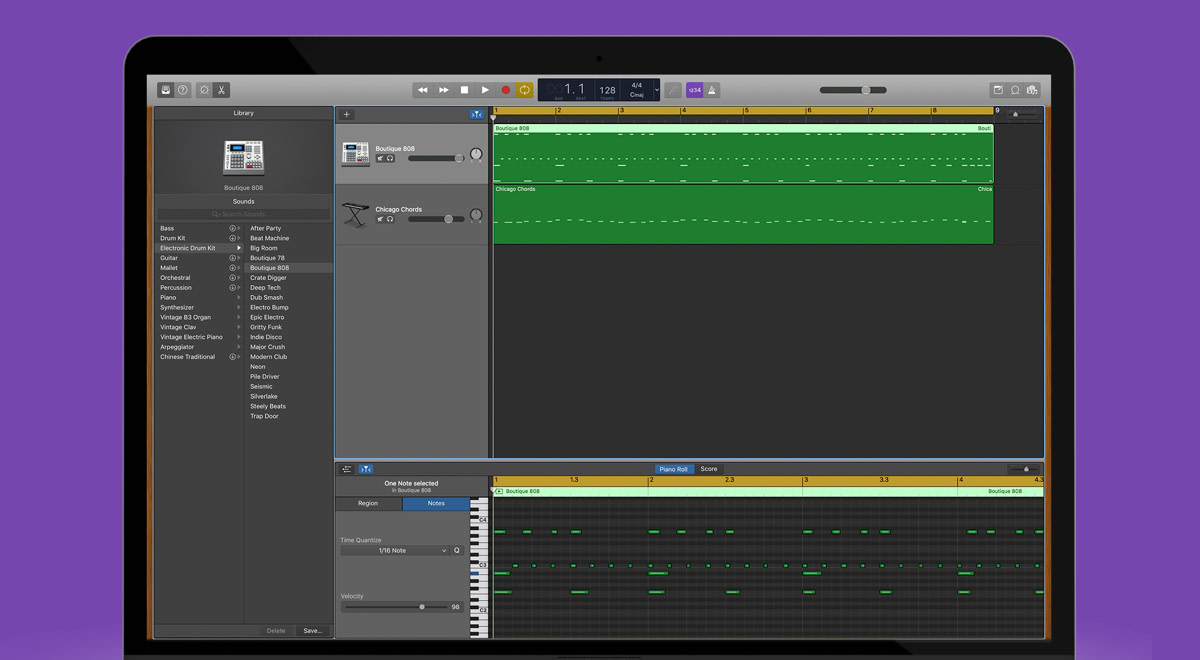
3) Once you’re there, you can select the Electronic Drum Kit category, which will reveal a set of available kits. Let’s select Boutique 808, which should go well with our Chicago Chords instrument.

4) You can now use the on-screen keyboard (Cmd + K) or your MIDI controller to trigger the drums. You’ll need to make sure that your controller or the on-screen keyboard is set to the octave of C1, as this is the octave range that the drum sounds are triggered by. You can change the octave of the on-screen keyboard by pressing Z (down) or X (up).

5) Once you’ve got a beat you want to use, you can record it using the same steps we covered earlier; take a look back at the Recording your sounds section to refresh if you need to.
6) You can ‘overdub’ (record over the top) and add more beats by clicking the Record button again. Don’t forget, you can make changes to your recording in the Piano Roll by double-clicking the MIDI clip!
Arranging and mixing your song
Okay! So you’ve recorded some different MIDI clips containing beats and melodies, but you’ll want to arrange these in some sort of order to create the different sections of your song.
1) Click and drag each MIDI clip to move it around the arrange page, or you can loop each MIDI clip for as long as you like by hovering your cursor over the top-right corner of each MIDI clip, allowing you to extend sections.

2) You can mute clips to add dynamics to different sections of your song using the M button on your keyboard. Pressing it again will unmute the clip.
3) If you want to change the volume or ‘mix’ each track, you can do so using the volume sliders on the left of each track. This allows you to make sure every track is balanced and coming through clearly.

Exporting your song
Once you’re happy with the arrangement of your song, you can export your song as an audio file for you to listen back and share with others.
1) Drag the loop selector we looked at in Recording your sounds to cover the full length of your song, from start to finish, making sure you leave enough room at the end to let the sounds fade out in to silence.

2) In the menu bar at the top of the screen, select Share and then click Export to disk.

3) Here you can name your song as well as choose the type of audio file you wish to save your song as; you can use .mp3 for smaller file sizes making it easier to share, or .AIFF/.WAV to ensure that your song is exported at the highest quality.
And that’s it! Don’t forget to save your GarageBand project so that you can come back and edit or add to it at any point.
